|

J.
A way for you to grow a 'solid-looking' pillar of fuchsias |
 To Dutch version
From
literature I have been able to achieve a solid look pilla. Each time I followed the
instructions read in fuchsia books, such as'Fuchsia's Hebben en Houden' (freely
translated as 'Fuchsias to Have and to Hold'). Whatever cultivar I used, each time the
result was the same. After having the tops pinched, only the upper part of the fuchsia
grew. Recently have I archieved good results, creating a solid looking fuchsia pillar,
using standard fuchsias. Here below the description of a succesful method. |
|
. |
| . |
| The
method of building from a pillar with some cuttings placed close together |
|
|
The
method of building this pillar is based on very closely planted cuttings. Each cutting is
placed 3 cm from one another, around a stick. This stick should be as long as the height
of the pillar you desire. The most suitable stick is a newly available variety, made of
green plastic. One of the cuttings has the top nipped out at 10 cm. The next cutting
follows at 20 cm higher. The topping of following cuttings goes allways one step of 20 cm
higher. So it is the number of cuttings you plant that will determine the hight of the
pillar. For instance, 6 will give a pillar of 1,10 m. This will, once in full bloom, grow
to 1,50 m. |
... |
| Growing a
'solid-looking' pillar |
You
must realise that the growing of this beautiful 'structure' will take a few years. During
the first year the plant will not flower, as they are being regularly pruned. When
pruning, endeavour each time to achieve a 20 cm dia 'ball' shape. Pay attention that you
prune only after one or two pairs of leaves. Failure to do this will result in a more open
top.
If it is desired to
let the plant with shorter internodes grow a little more (thus to get longer internodes),
one must stand the plant in a shady position. In winter give the plant as much light as
possible and keep the plant growing. If during the winter, it is moist in the glasshouse, do
not top, as the chance for botrytis is increased. It is best to wait for a day
without frost and it is then sunny. Allow the glasshouse to air, and then commence with
pruning.
To achieve best
results, the plant will need plenty of pruning in the second year. Excellent results are
obtained, |
|
. |
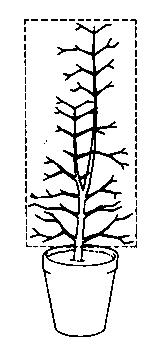
| Traditionally
way of growing a pillar. |
|
|
|
only if you allow the individual tops to touch its nearest neighbour's.
Prune every second pair of leaves for a tight ball. Once the balls of every plant are
'seen as one', stop with further pruning. The fuchsia is now ready for flowering. With a
little luck, you will have a well formed and flowering pillar, after 18 monthes of hard
work. In the third season you will have a good pillar with plenty of flowers. |
. |
Each year thereafter pruning has to be carried out until the end of March.
Keep on doing this of the second pair of leaves. Any shoots that want to form second or
third tops must be removed. Leave the neighbouring leaves on the trunk. These assist the
juices to run through the trunk, so helping the fuchsias to get healthy and thick trunks.
If the trunk is too thin, the plant cannot come to its full potential. Should you leave
the shoots to assist with trunk development, be sure that you prune the correct ones. If
you leave the shoots on the plant, they will develop still weaker shoots.
Place the pillar in a
sunny position of the garden, after having determined that your chosen variety does
tolerate a lot of sun. The pillar is to be rotated, one third of a full turn, at least
every third day. Failure to do so, will result in a crooked growing fuchsia pillar. During
the winter ensure that the bottom half of the fuchsia gets enough light in your winter
storage area. During the first two years the plant requires excellent light to come
through the winter.
Fertiliser, rich with
nitrogen during the initial growing period, watering, as well as protection against pests
and diseases, are the same as for your other fuchsias. |
| . |
Which varieties are best for your pillar? |
For standard fuchsias, to be used in your pillar, it is best to chose
those that are easiest to winter. Also watch out for good growing types and those that
were needed can in a simple way to be made into semi-hanging fuchsia or even a shrub. With
these types there is less chance for any 'holes' in the pillar for the trunk to be seen.
If your chosen variety easely developes sideshoots and grows with short internodes, you
will have made a good choice.
If a triphylla variety
was used, the problem will arise, that the top of the young plant, will start to flower,
when it is desired for normal growth to continue. This is resolved by pinching out the
flowers, and sideshoots will develop. Leave this growth, tying it in such a way, that it
will grow straight. It remains advisable to give extra nitrogen. This will promote growth,
before the flowering starts. A pillar using triphyllas must be located in a sunny
position, otherwise the internodes will become too long and the pillar will appear skinny.
|
. |
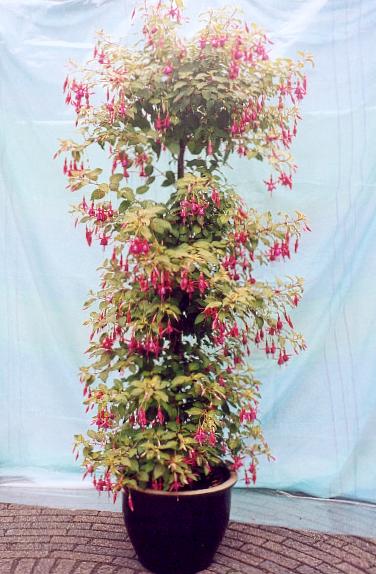
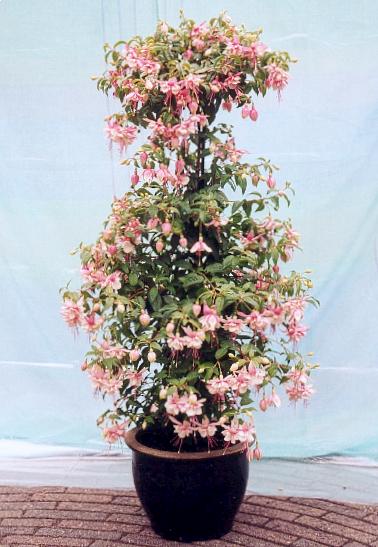
The
result in summer 2003 |
| |
| . |
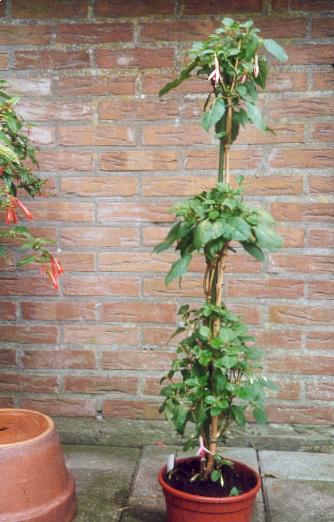
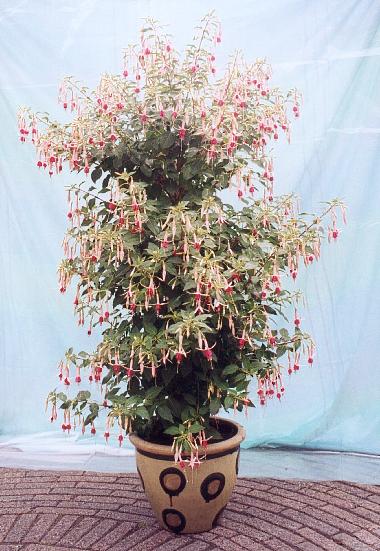
| In the
garden by the author of this article - Hans van Aspert - is to see on this three pillar
varieties, that this breeding method allready delivers a real 'solid-looking' pillar after
a year. It is to aspect that after the following growing season the pillar by further
growing close, get over the full hight a perfect dense form. The first photo in this
article, photografied in Oktober 2002, is pictured from the same pillar to the left above,
but than photografied in July 2003. |

Gelderse Fuchsia Info-site -
 November
2008 November
2008 |